![Rebrand Logo Mark No ISO.png]](https://knowledge.sitemarker.com/hs-fs/hubfs/Rebrand%20Logo%20Mark%20No%20ISO.png?height=40&name=Rebrand%20Logo%20Mark%20No%20ISO.png)
Table of Contents:
What Layer Groups are for
Layer Groups let you organize your map layers into collapsible folders and act on all of them at once. On a project carrying a full plan set, groups are the difference between a scrollable list you can work and a wall of sheet names.
A group is a container in the Map Layers panel. Every layer inside it collapses under one header, and that header carries controls that act on the whole set: show and hide, and opacity.
Groups earn their keep in many situations:
Plan sets. A civil plan set arrives as dozens of sheets. Grouped by discipline or by sheet series, the list stays readable and you can bring the whole discipline on or off in one action.
Revisions. When a drawing gets revised, SiteMarker keeps the previous layer alongside the new one. Grouping by revision lets you flip an entire round of drawings on and off to compare before and after, instead of hunting for matching sheets one at a time. See article about properly versioning your CDs
Phases and areas. On multi-phase or multi-area sites, grouping by phase means the crew working Phase 2 turns on Phase 2 and nothing else.
Long Linear Projects. On projects where you need a dozen drawings to cover a highway or street, having them in a group means the team turns them on in one go instead of one at a time.
The payoff scales with the project. Ten layers do not need groups. A hundred layers are unusable without them.
Creating a layer group
- Open the Map Layers panel.
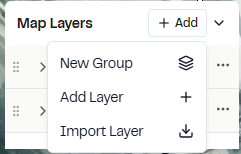
- Create a new group and give it a name.
- Drag existing layers into the group, or add new layers to it directly.
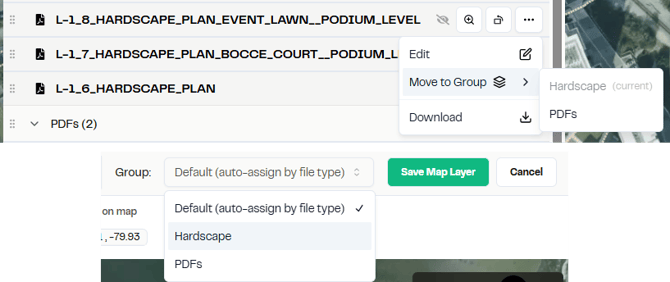
Name groups the way your team talks about the work, not the way the files were named. "Phase 2 Grading" beats "Set B rev 3."
Reordering layers and groups
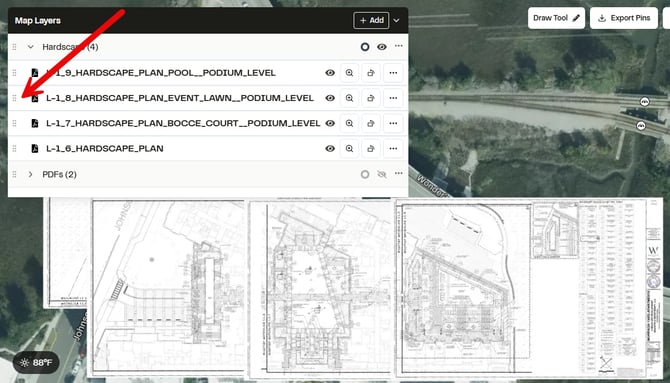
Map layers stack. The order in the panel is the order they draw on the map, so the layer at the top of a group sits on top of the sheets below it.
Reordering is drag and drop. You can move layers within a group, move a layer from one group to another, and move whole groups relative to each other.
Two things worth knowing:
- If a sheet is not showing when you expect it to, check its position in the stack before you assume it failed to upload. It may be sitting under something opaque.
- Put your most-referenced sheet at the top of its group so it wins by default.
Show and hide the whole group
The eye toggle on the group header hides and shows every layer inside it in one action. This is the fastest way to clear the map: collapse the disciplines you are not working and toggle them off, and the sheets you care about are the only thing left on screen.
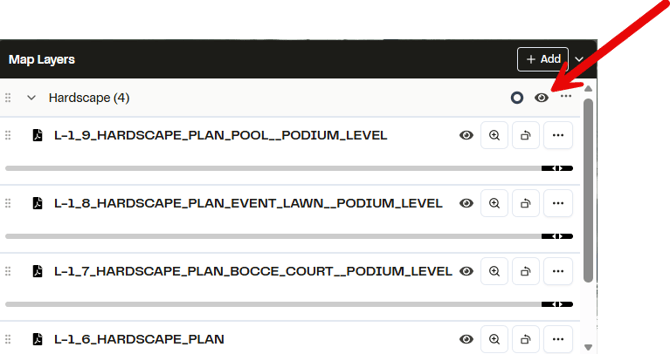
Hide and show is separate from opacity. The eye toggle handles on and off. The opacity ring handles everything in between.
One behavior to expect: if you have set a group opacity, hiding the group and bringing it back returns its layers at that group value, not at 100%. A group whose opacity was never set comes back at full.
Group Layer Opacity
The ring control on the group header, just left of the eye toggle, steps every image overlay in the group down together. This is how you read the aerial or the ground underneath a stack of drawings without touching a single layer.
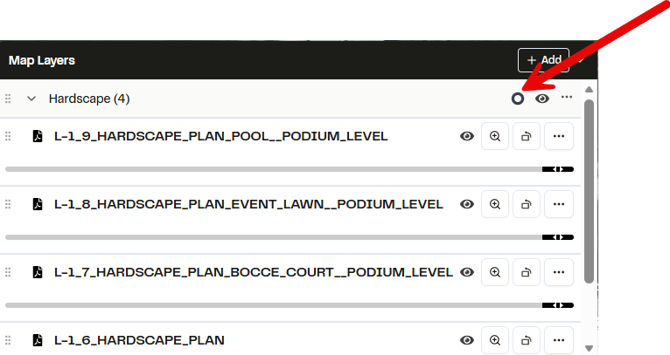
How it works:
- Each tap steps the group down 25%: 100 to 75 to 50 to 25. The next tap returns it to 100%.
- There is no 0% step. Use the eye toggle to hide.
- The ring fills clockwise to show the current value. The exact percentage lives in the tooltip.
- Before you touch it, the ring reads the group's current layer opacities and seeds to the nearest step of their average.
What it applies to: image overlays only. That means PDF, TIF, TIFF, PNG, JPG and JPEG, the same file types that already have an individual opacity slider. KML and KMZ layers are left alone, and a group holding no eligible layers shows no ring at all.
Individual sliders still work. Set the group first, then drag one sheet heavier than the rest if you need it. The next tap on the ring overwrites those individual tweaks and puts the group back in sync.
When a group is hidden, the ring reads as inactive. Tapping it shows the group again rather than cycling the opacity.
Persistence: on mobile the group value is cached on the device and survives a reload, so the map opens the way you left it. On web it lasts the session, which matches how the individual sliders already behave.
Best practices
Group by how you work, not by how the files arrived. Discipline, phase, or area beats upload date almost every time.
Keep groups small enough to scan. If a group has thirty sheets in it, it is a second wall of names. Split it.
Collapse what you are not using. A collapsed group is one line in the panel. Collapsing is the cheapest way to make the list workable.
Set group opacity once and leave it. For teams that always want the aerial readable underneath, set the group to 50% and let it persist. Field crews on mobile keep that setting between sessions.
Keep KML layers in their own group. The opacity ring will not touch them, so mixing them in with image overlays makes a group behave inconsistently.
Order the stack deliberately. Most-referenced sheet on top, base and background sheets at the bottom.