![Rebrand Logo Mark No ISO.png]](https://knowledge.sitemarker.com/hs-fs/hubfs/Rebrand%20Logo%20Mark%20No%20ISO.png?height=40&name=Rebrand%20Logo%20Mark%20No%20ISO.png)
To create a pin, you must create a project to drop the pin on. See how to do that here: FAQ: How to create a project

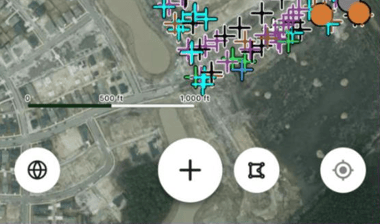
Now that you have a project, we can get into dropping a pin! There are several options on the mobile project screen, but to drop a pin navigate to the Site Map Screen shown on the right side.
To learn what the other items on this screen are check out the Mobile Project Dashboard FAQ (Coming Soon)

A lot is going on here... but we will focus on the pin dropping segment for this tutorial. To see more of the Site Map screen see Mobile Map Screen FAQ (Coming Soon)
Your screen may look a little different depending on the version you are on, but the plus button remains the same method of initiating the pin drop.
After you click the pin button, you will see the pin dropping screen appear. See that example below:

The updated map screen (mobile app):
The map screen in the app got a refresh. Here is what changed when you drop a pin:
- Drop Pin is the big + button at the bottom of the map, next to the draw and locate buttons.
- Your blue dot marks the drop spot. A pin dropped with + lands where you are standing. To drop it somewhere else, tap that spot on the map instead.
- The app waits for a good GPS reading. When you tap +, it takes a fresh reading. If the signal is weak, it tells you and lets you wait for a better fix or drop the pin anyway. Pins placed by tapping the map skip the wait. More in getting better location accuracy.
- Swipe from pin to pin. Tap a pin on the map and a card for it appears at the bottom. Swipe the cards to move through nearby pins, nearest first, with the distance and direction to each one.
Capturing Information:
Camera Mode:
Video Mode:
-
- Capturing Video on Pins
Descriptions: Descriptions, or notes, is what your first note will be. Learn more here
Different Types of Pins:
General Pins:
These pins are meant for generic pin drops, typically used for a field report or punch list. See more about reports here: FAQ Reporting
Status: Choose between Observation, Needs Action, or Corrected based on the status you would like to represent.
Categories: By default, we have 8:1:1 categories. These can be custom-tailored at your request.

SWPPP Pins:
These pins are meant for the more regulated SWPPP inspection. See more about reports here: FAQ Reporting
Status: Choose between Observation, Needs Action, or Corrected based on the status you would like to represent.
Violation Types: Each Violation Type gets stashed into the report and automates a checklist based on that list.
Tree Pins:

Species: We have a list of species that we provide the user.
Grade: Relate the state of the tree of of the selections to the left
Rating: Between Poor, Fair, and Good
Trunk Size: Write the measurement of the trunk
Irregular Canopy: denote if the trunk has an irregular canopy
Direction: Show the direction of the tree
Finalizing Pin Details
After adding Photos, Notes, Type, Status, and relative Categories, you will be able to create the pin. To check and track it's upload progress (speed of upload will change based on the number of photos attached and cell strength) here:
