To create a report, select the project. After you drop the pins you would like to include in your report you can begin! See how to drop pins here
Click the reports tab and then click the blue button “Create Report”. You can also create a report from your mobile device in the same sense.

After clicking "Create Report" you will be provided with three options:
Field: This is typically in an informal punch list report that compiles all general pins that you have been using to monitor your construction site
SWPPP: This is a more formal report that meets the guidelines for South Carolina at the moment. You will see additional information boxes than what is on a field report that is designed to be seen by an inspector or governing body.
Tree: This is similar to the field report but more focused on a list of all tree pins that have been dropped
Filtering
Each of these reports shows the same filter mode on the screen after clicking on the type of report you want. The filter screen is shown below:
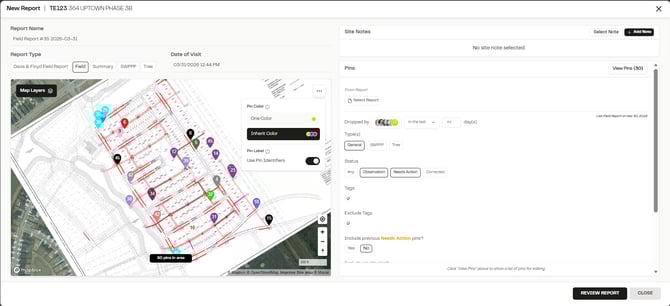
Site Notes: Choose and edit which Site Note is included. See more here
Dropped by User: Toggle which user's pins will show up
Date of Visit: Shows the time of report creation (editable)
Report Name: Shows the default name of the report (editable)
Report Type: Here you can pick the type of report you want to create if you clicked the wrong one at first
The Map: in the map modal you can choose what layers you want to be activated in the report, as well as see an example of what pins you are including in the report.
- Pin Color: Choose if you want the pins to be one color, or match the color of the pin
- Pin Label: Toggle on to match the pin number to the number represented on the map. If the toggle is off, we will show pins starting at 1 and go up from there. Turning on will maintain that setting until turned off
Pins: Here is where you can set your filters. There are several different options on how you can narrow down your reports to only include pins you want:
-
- From Report: Select the filter used on a previous report (useful for repunching a walk)
- Types: what type of pins you want to include
- Status: you can narrow it down to only needs action if you are sending a report of what still needs to be done
- Include Previous Needs Action Pins: shows a list of pins that were needs action the last report you made
- Include Private Pins: Each pin has the ability to be toggled to private, where only you can see it. These can be included.
- Filters: For Field Reports and Tree Reports all of the categories that you see dropping pins will show up here and you can filter the pins based on that.
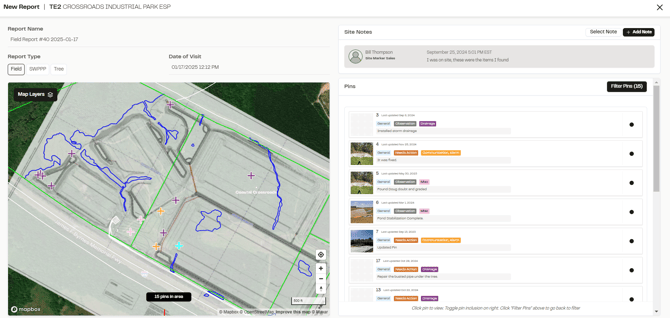
Clicking the "View Pins" box in the upper right of the filter screen brings you to a modal where you can deselect pins that you do not want to include:
When you are all done with the report filters you can click "Review Report" and it will bring you into a draft view
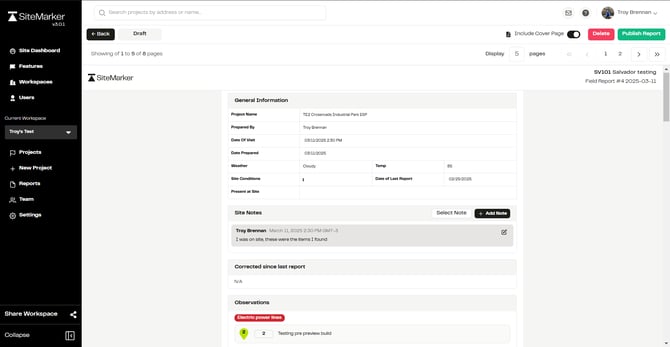
On this page, you can edit most boxes if you want them to say something else, or adjust maps and the layers to your liking.
On the top right, you will see a button that says Cover Page. If your workspace has a cover page uploaded to the workspace, this will be on by default. a cover page allows you to put company branding at the front of every report.
Site Notes: You may notice that site notes can now be edited and changed in the report. The Site Note that gets brought into the report is controlled by two factors:
By Default:- Last Site Note: Only the latest Site Note will be pulled into the report.
- Filters: The last Site Note is only included in the report if the filter for days since report fits in the dates of the Site Note being created
- i.e. a Site Note created a week ago would appear in filters that are 7 days or longer
Options (on Mobile and Web):
- Ability to Select Specific notes on the project

- You can remove a note from the selection
- Add and create a new note to be reported on
- In-line editing for the notes in this view and in the report draft (if you are the creator)
- Photos are included in the report
On each map screen, you can add the layers that you want:
- Layers
- Page Duplication
- Page Hiding / Delete

After selecting which layers you want you will see a save button appear that locks in the selection you made:

Report Pins
While you are editing a report page with a pin on it, you can change the window size and display specific layers. When you start making a change, you will see a few buttons appear:
- Save zoom to all maps
- Save layers to all maps
Toggling either of these, and pressing save, will automatically adjust the rest of your pin pages to be the zoom and layer state you just set. See video for a visual guide
Publishing Reports
When you have looked it over and it is ready to go you can click publish report in the top right.
Doing so brings up this modal:
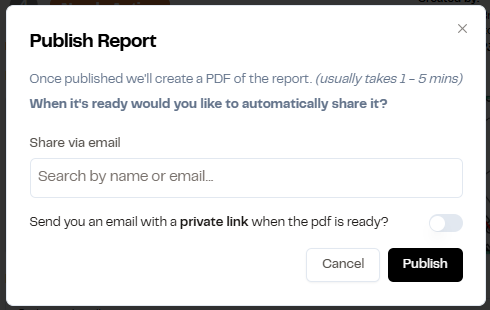
Here you can have Site Marker automatically send the report to people on the project or to yourself by default after publishing.
After the report is published you can share it a view different ways. Check the link to that post here